
 Are you automating your mixes yet and getting the sheen and polish that the pros get? Why not? Automation is free and doesn’t require any special hardware or plugins. All you need are your ears and a DAW that does automation (most do). Read on for creative ways to wiggle your knobs!
What is automation?
Automation is not talked about that often, and you won’t see it popping up in the online ads that follow you around the internet. Why? Because it’s something that you can do for free with no special hardware or expensive plugins. As long as you’ve got a regular DAW and you’re prepared to bring your ears to the party, you’re ready to add automation into your mixing workflow.
It’s most common to automate a track’s fader level, but you can use automation to make real-time adjustments to equalisation, panning, effects levels, muting, and individual plugin parameters (like the mix knob on a compressor). You don’t have to stick with just automating tracks; you can automate group busses and the entire master buss, and doing so is very common. The automation appears as an automation line on the audio track or on a separate automation track in your mix.
The most common element to automate is the lead vocal, because it is often a very dynamic element with level fluctuations making it easily masked by other instruments, thereby reducing its intelligibility in the mix. Immediately, you might be saying, 'a compressor will fix this issue,' but that's often not the case due to under and over-compression on the very quiet and loud parts. However, level automation is very effective in conjunction with a compressor, enabling you to 'pre-condition' the signal level before hitting the compressor.
The most common element to automate is the lead vocal, because it is often a very dynamic element with level fluctuations making it easily masked by other instruments, thereby reducing its intelligibility in the mix. Immediately, you might be saying, 'a compressor will fix this issue,' but that's often not the case due to under and over-compression on the very quiet and loud parts. However, level automation is very effective in conjunction with a compressor, enabling you to 'pre-condition' the signal level before hitting the compressor.
Here’s what fader level automation looks like on a few phrases of a lead vocal track. While the boosts and cuts look huge, most are in the region of 1 - 3 dB maximum.
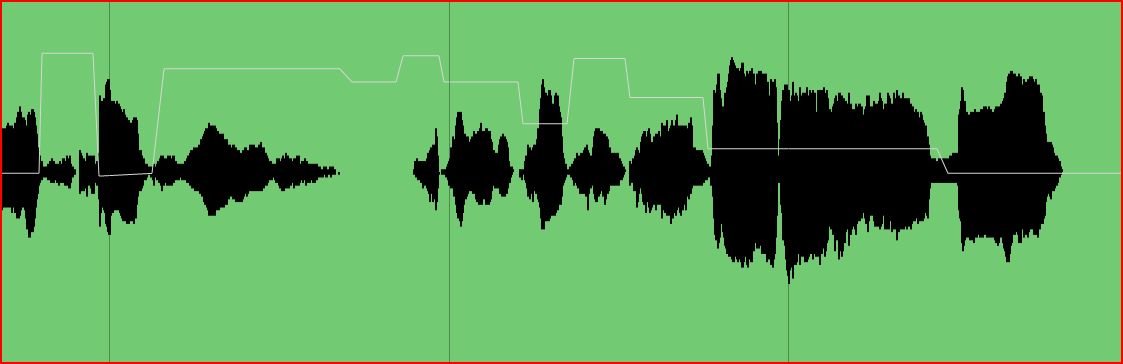
Image 01:
The black waveform of the recorded vocals is very dynamic and requires levelling so that the vocal sounds balanced in the mix. The white line indicates the volume changes of the track fader, where quite words are raised in level, and louder words are reduced.
“Automation enables you to make big bold moves,
or craft subtle enhancements,
all with pinpoint accuracy.”
Here are thirteen things that I routinely automate in my own mixes:
2. Lead elements – balancing the levels of individual notes in a guitar or instrument solo.
3. The drum room mic – to raise the level of the drum room mic in choruses or other song sections where I want to bring up the room ambience of the drum kit
4. Backing vocals – to balance the group buss level of backing vocals against the lead vocal and other elements in the mix.
5. Drum fills – to raise the level of a drum fill that I want to highlight in the mix
6. Instrument buss – I routinely adjust the level of entire groups of instruments (e.g. all my rhythm guitars) so that they sound perfectly balanced and avoid masking the lead vocal.
7. Simple fade-ins and fade-outs of a track or group buss.
8. Lead vocals – keeping them clear over the music, emphasising consonants, and maintaining perfect articulation throughout the entire mix.
9. Adjusting the panning of tracks between verses and choruses – keeping my verses narrow and my choruses big and wide.
10. Balancing the signal level into a compressor – levelling the input of a vocal track into its compressor to avoid over-compressing loud phrases and under-compressing soft parts.
11. Muting/un-muting – turning plugins and plugin parameters on and off throughout the mix.
12. Boosting and cutting EQ – adding a little presence to give an element emphasis in the mix, like a 5 kHz boost to a vocal during a heavy guitar-dense chorus. Or, cutting the same frequency range in the guitars to give a lead vocal more clarity.
13. Modulation effects – raising and lowering the levels delays, phasing, flanging, etc. throughout the mix to give ever-changing colour and interest.
Why is automation so effective?
The things I love about automation are:
2. It’s really the ONLY way to achieve a perfect mix balance because the levels of musical elements are adjustable with pinpoint accuracy.
3. You can make punchier, fuller-sounding mixes because you don’t have to rely so much on compressors to do your levelling.
4. It’s a secret technique for getting a perfect vocal sound in the mix because there is precise control of vocal articulation and level.
5. It’s free – no explanation needed!
The downside
Here’s the downside with using automation; you have to spend time doing it!
I’ve heard of mixing engineers spending a full day automating their lead vocal on a song (I usually spend about one hour). Then, I’ll spend another 32 - 3 hours automating small level adjustments on lots of elements to further balance the levels in the mix.
One thing to be aware of about automation is that mostly it’s not about big volume level boosts and cuts. It’s much more subtle; usually, cuts and boosts of a 1 - 3dB are perfect. When I automate a level increase of an entire chorus section, it usually only takes 1.5 dB to add a subtle impact. Similarly, automation rides on the lead vocal are routinely in the region of 0.5 – 3 dB. The big takeaway is that automation is done with subtlety. And once you’ve automated several elements in your mix this way, the layers of subtleness build up to create a mix that sounds full, punchy, and awesome.
“Automation is the most precise way to make ongoing, real-time adjustments of any parameter in the mix.”
Creative vs Corrective
All automation moves can be classified as either corrective or creative. If you’ve read any of my other books like 56 Mix Tips for the Small Recording Studio, or Mix Automation for the Small Recording Studio, you might recall that I refer to this creative/corrective concept as a general approach to almost everything you do in a mix. This encourages you to work with more purpose and clarity, and help you recognise when you’re wasting your time going down rabbit holes.
For example, when using automation on the lead vocal, some corrective moves would be to get the complete vocal track levelled and reduce sibilance. Whereas creative moves might include raising the reverb level on the last word of the verse or automating the wet/dry parameter on a distortion plugin to get a little saturation for a different colour in the verses. Suffice to say, the creative options are endless, and provide a powerful way to depart from that ‘static’ sounding mix to a mix with vibe and movement where elements pulse, move around and have a life of their own.
Another one of my fave uses for automation is to reduce frequency masking in the mix. Frequency masking has got to be one of THE biggest challenges when creating a clear mix. Masking becomes more of a problem as your songs get denser; the chorus in a heavy rock song is a perfect example. Often, the lead vocals get masked by distorted guitars and heavy cymbal work. It doesn’t work to merely raise the vocal level because this genre demands that the vocals sit well into the mix. So there’s the problem: vocals sitting down in the mix EASILY get masked by thrashing guitars and hurricane cymbals. In this situation, my go-to method is to automate EQ plugins. So I’ll automate a slight scoop in the guitars and a small complementary boost to the same frequency in the vocals. I’ll also automate a dip in the drum overheads in the higher frequencies and a corresponding boost to the vocal. This improves articulation. These moves only come in to play during the chorus, then the EQ returns to normal.
I know what you’re thinking…so much fun and so little time. But here’s the big takeaway – and it’s perhaps what I love most about these techniques - Automation enables you to make big bold moves, or create subtle enhancements, all with pinpoint accuracy.
Leave it to the Pros?
A while back, I read on a popular forum that, ‘automation is for the big boys.’ In other words, the kids don’t get it! However, when the penny drops and they finally get around to understanding the huge potential that automation offers, then they’re all over it like a rash while they’re kicking themselves for not using it earlier. With a little research, you’ll find that automating the mix is standard procedure for many of the pro-level mixing engineers because it’s the only way to make the real-time fine-tuned adjustments that are necessary for high-quality music mixes.
Sound Examples
Anyway, talking about it is one thing. Listening is another...
This audio clip includes the lead vocal with automation. Note the difference in the clarity of the lead vocal compared to the next audio clip. In this clip, very mild compression was used when recording the vocal, but there is no compression applied to the vocal in this mix. A HPF is set at 100 Hz to remove rumble. Automation included level automation to even out the different recorded level of words, and equalisation automation to control breaths and sibilance.
This clip has the same instrumentation, but the vocal has no automation and no compression. A HPF at 100 Hz was used to remove low-frequency energy.
This track includes the lead vocal with HPF and level/EQ automation as described above.
This track includes the lead vocal with HPF and level/EQ automation as described above.
This clip is the original recorded vocal with the 100 Hz HPF applied, with no compression or automation.

Image 02:
This image shows the leave vocal audio track in the top with level automation and the 4.7 kHz equalisation below. The blue sections of the clip are where the clip was spliced and a couple of dB of clip gain was applied to reduce the automation level boosts required. The main focus of the level automation was to raise the level of quiet phrases, reduce loud parts, and increase the 'tails' of words to stop them from getting lost in the mix. The 4.7 kHz equalisation was applied specifically to add clarity to consonants and enhance or reduce sibilance.
How do You do it?
Automation is done near the end of the mixing process. After you’ve done all your sound design, EQing, compression, panning, and set your general levels. My approach is to do the best ‘static’ mix (no automation), and then perform my corrective and creative moves at the end.
One of the many benefits of adding automation into your workflow is that the more you do it, the more you will see its potential to use it in other situations. For instance, during the early stages of the mix, you might hear a lead vocal with excessive level fluctuations. The intuitive thing is to throw a compressor on it to level it out. But if there are excessive level fluctuations, you may realise that level automation is a better option because it will preserve the vocal’s sonic character, where a compressor might over-compress on loud phrases and not activate on the quieter words. In this situation automating the level will allow perfect levelling without any compression.
In terms of actually performing automation, although each DAW has its own personality, the methods for doing it are roughly the same. Perhaps the most common (and precise) way is to create an automation track or activate automation on your audio track. Usually, a line will appear that you can click and adjust to alter the level of the thing you’re automating. When you play back the track, the real-time adjustments will be audible.
The second way to automate a track is to do it in real-time. To do this, activate automation, set it into ‘write’ mode, and then play back the track while manually adjusting the fader or parameter in real time. Obviously, you’ll need to refer to your manual for instructions.
Give automation a go and let me know how you get on – I’d love to hear from you.
Summary:
Hopefully, you can see the enormous value of automating your mix. Here’s a quick recap on the key benefits of automation:
1. Corrective adjustments can be made with pinpoint accuracy.
1. Corrective adjustments can be made with pinpoint accuracy.
2. You can create vibe and colour by continuously varying effects in the mix.
3. It’s a killer way to get a perfect lead vocal sound.
4. The perfect way to add polish and sheen to your mix.
If you found this blog interesting and you want to explore automation further, grab a copy of my book, Mix Automation for the Small Recording Studio on Amazon. It’s available in print or for Kindle.

Happy knob-twiddling.
Thanks again for stopping by
Amos


No comments:
Post a Comment